Table of Content
For the bed slats you can use 1×4’s or plywood. You might need to trim the items to suit between the head/foot boards and rails. Secure boards with wooden glue and 1 1/4″ brad nails.
The items were all cut out and he or she was given glue and a screw driver to assemble. You can use any shade you want in your dollhouse. If you’re not glad with the way it looks, you might need to redecorate or even start from scratch. As a father or mother, you could be in search of methods to maintain your children occupied. A good way to do that is by getting them some dollhouse equipment. Here are a variety of the most important ones that you want to get for them.
Tips On How To Personalize An 18-inch Doll Mattress With A Monogram
I painted the bed and nightstand base with Americana Decor Whisper chalky finish. I stained to top of the nightstand Minwax polyshades mahogany bombay. Looking ahead to seeing your future projects. Don’t forget to share your tasks with me, as I love seeing what you guys are working on.
I spray painted the letter with Rustoleum Pink Glitter Spray paint, then eliminated the tape. For slightly added bling, I determined to add Pink Glass knobs to the outer corners, each set in place with a grabber screw. Remove any extra glue, apply wooden filler to nail holes, cracks and blemishes and permit to dry.
Great Mattress Equipment, Now I Need A Concept For The Two Boys
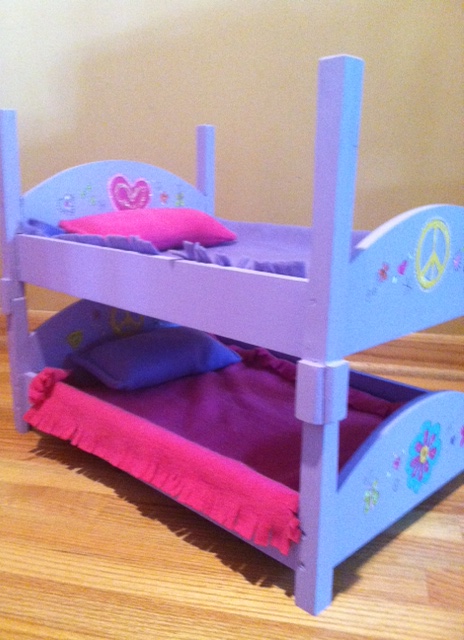
Even if I don’t have taking part in with the dolls in my behavior, I nonetheless love the bunk bed, as it is a pretty-accurate scale model. Time to make the second one for the 18 doll bunk mattress. After printing the plans, I reduce all the parts at the right measurement, using my miter saw. I used 1x2s for the entire project, apart from the underside panels, which are made from 1/4″ plywood.

If the Inserts don't match exactly, use a sander to shape. Assemble as shown with glue and 1-1/4” pocket screws. Cut the pieces for the Headboard and Footboard Inserts. Using your jigsaw, cut out the 1-1/2” rounded outer corners. With the Kreg jig set for 3/4” materials, drill pocket holes in every finish of the Headboard and Footboard Inserts. Homemade is method better than retailer purchased so listed below are free plans to construct a dolls bed.
Doll Sink And Dishwasher Cupboard
I nonetheless bear in mind how much I enjoyd it . That is concerning the cutest factor I've ever seen and I am completely impressed to make a quilt for my very own mattress. I assume I'll need to find a good friend with a child in want of a doll bed. Legs Now connect the legs to the panel with 2″ screws and glue. Be careful to screw into the panel boards and the underside. Drop one insert into every Headboard and Footboard.
I see lots of them in my future for presents and for the opposite two women, so that they don’t always should struggle over this one. The headboard is a 1″ X 8″ board and the foot board is a 1″ X 6″ board. If you'll purchase lumber for this project, I would make them the identical. The remainder of the mattress is made utilizing 1″ X 2″ boards. In this page I share with you a large assortment of free scroll saw fretwork patterns.
Step Four
On both the head and foot boards mark up three 1/4″ from the leg bottoms. Attach a 12″ mattress help with wooden glue and 1 1/4″ brad nails. Use wood glue and 1 1/4″ brad nails to attach 2 – 8 1/2″ roof pieces together. Make a doll mattress for an 18″ doll or a baby doll from just one board! The scraps make a mini doll nightstand or stool for a 2-for-1 straightforward woodworking project.

A fun project for a child’s room is a DIY dollhouse. Assembly Now merely predrill holes and screw the frame to the headboard and footboard. And screw the bottom panel boards to the panel, as shown above.
Murphy Bed Digital Bookcase Plan - Wooden Project Pdf, Step By Step Digital Plan, Digital Download
It’s as much as you what you want your dollhouse to look like. If you are utilizing a unique sort of material than cardboard or foam board, ensure to check the adhesive before beginning development. The number of details you embrace in your plans will rely upon what type of dollhouse you are making. If you need to make a extra detailed house, you must use a thicker piece of cardboard or foam board and reduce it into the desired form. They’re additionally a fantastic thought for a babysitter (or a babysitter-in-training!) as a outcome of you can get away from your daycare/preschooler for a number of hours.

Use veneer edging to cover uncovered edges of the plywood if desired. To assemble this home mattress I used wooden glue and brad nails, if you’re extra snug with pocket holes, that’s great too. Click right here to purchase the printable doll mattress plans and templates. Now, I can really see this doll mattress beginning to appear to be the one I actually have envisioned. As alongside as you allow no gaps between the elements and you align the edges flush, you shouldn't have any issues constructing this project in a day. As you can see within the image, the project is beginning to take shape nicely.
Thankyou I am so glad you posted this I tried to design one myself and it was a multitude , simply in time for christmas. Hmm...do I actually have time to make the easel, end the quilt for the neighbors and build this bed?? If not, this might be my niece's b-day present next yr.

I would additionally love the sample to the bedding. When portray or adorning your dollhouse, try to use light and impartial colors so it's going to match any furnishings or equipment you add later on. Now it’s time to embellish your dollhouse!
You can use paint, stickers, or other decorations to make it appear to be your individual home. It’s up to you what style you want for your dollhouse! You can even adorn the inside of your house.


No comments:
Post a Comment